1. Prerequisites
Before setting up Archinsight locally, ensure the following components are installed and configured:
1.1 Docker
Archinsight utilizes containerized services for easier deployment and management. While Docker Desktop is a commonly used solution, its recent licensing and performance issues may impact usability. We recommend exploring the following alternatives if Docker Desktop does not work well for your setup:
- Rancher Desktop – A free and open-source alternative with built-in Kubernetes support.
- Podman – A daemonless container engine compatible with Docker commands.
- Colima – Lightweight and macOS/Linux-friendly, using Lima and QEMU for virtualization.
For Linux users, native Docker installations typically provide the best performance.
To install Docker or an alternative:
- Docker Desktop: Installation Guide
- Rancher Desktop: Installation Guide
- Podman: Installation Guide
- Colima: Installation Guide
The examples in this guide use Docker Compose for easier setup and management. If the chosen tool does not support docker-compose, the environment can be set up manually using basic docker commands.
1.2 Java Development Kit (JDK)
Ensure that Java version 20 or higher is installed on your system. You can verify the installation by running:
java -version
javac -version
The output should confirm Java is installed.
1.3 GraphViz
Archinsight relies on GraphViz for graph rendering. Since precompiled packages are no longer directly available from GraphViz, you can install the package using binaries provided by third-party sites. Detailed installation instructions are available on the official GraphViz website.
1.4 Envoy Proxy
Archinsight uses Envoy Proxy version 1.27.0 for development environment as a lightweight and easily configurable reverse proxy. It facilitates routing and load balancing between services. However, developers are free to use any other reverse proxy they are comfortable with.
version: '3.5'

services:
  gateway:
    image: "envoyproxy/envoy:v1.27.0"
    container_name: gateway
    hostname: gateway
    restart: always
    user: envoy
    ports:
      - 8081:10000
    environment:
      - ENVOY_UID=777
      - ENVOY_GID=777
      - loglevel=info
    networks:
      - archinsight
    volumes:
      - envoy.yaml:/etc/envoy/envoy.yaml:ro
An example of envoy.yaml file for the local development
static_resources:
  listeners:
    - name: listener_http
      address:
        socket_address:
          address: 0.0.0.0
          port_value: 10000
      filter_chains:
        - filters:
          - name: envoy.filters.network.http_connection_manager
            typed_config:
              "@type": type.googleapis.com/envoy.extensions.filters.network.http_connection_manager.v3.HttpConnectionManager
              stat_prefix: edge
              access_log:
                - name: envoy.access_loggers.stream
                  typed_config:
                    "@type": type.googleapis.com/envoy.extensions.access_loggers.stream.v3.StdoutAccessLog
                    log_format:
                      text_format: "[%START_TIME%] \"%REQ(:METHOD)% %REQ(X-ENVOY-ORIGINAL-PATH?:PATH)% %PROTOCOL%\" %RESPONSE_CODE% %BYTES_RECEIVED% %BYTES_SENT% \"%REQ(USER-AGENT)%\" \"%REQ(X-FORWARDED-FOR)%\" \"%UPSTREAM_HOST%\"\n"
              upgrade_configs:
                - upgrade_type: websocket
              http_filters:
                - name: envoy.filters.http.router
                  typed_config:
                    "@type": type.googleapis.com/envoy.extensions.filters.http.router.v3.Router
              route_config:
                virtual_hosts:
                  - name: localhost
                    domains: [ "localhost:8081" ]
                    routes:
                      - match:
                          prefix: "/oauth"
                        route:
                          cluster: identity
                      - match:
                          prefix: "/auth/"
                        route:
                          cluster: identity
                      - match:
                          prefix: "/"
                        route:
                          cluster: editor-ui
  clusters:
    - name: identity
      connect_timeout: 1s
      type: strict_dns
      dns_lookup_family: V4_ONLY
      load_assignment:
        cluster_name: identity
        endpoints:
          - lb_endpoints:
              - endpoint:
                  address:
                    socket_address:
                      address: host.docker.internal
                      port_value: 3336
    - name: editor-ui
      connect_timeout: 1s
      type: strict_dns
      dns_lookup_family: V4_ONLY
      load_assignment:
        cluster_name: editor-ui
        endpoints:
          - lb_endpoints:
              - endpoint:
                  address:
                    socket_address:
                      address: host.docker.internal
                      port_value: 8080
1.5 PostgreSQL Database
Archinsight uses PostgreSQL 15.4 or higher as its primary database. It provides robust performance, advanced SQL capabilities, and reliability for handling structured data. The application is designed to work specifically with PostgreSQL, and no alternative databases are officially supported.
version: '3.5'

services:
  db:
    image: postgres:15.4-alpine
    container_name: postgres
    hostname: postgres
    restart: always
    ports:
      - "5432:5432"
    volumes:
      - data:/var/lib/postgresql/data
      - init:/docker-entrypoint-initdb.d:ro
    environment:
      - POSTGRES_USER=<USER>
      - POSTGRES_PASSWORD=<PASSWORD>
    networks:
      - archinsight
Postgres requires to run init scripts at startup to create databases for identity
export PGUSER=postgres
psql <<- EOSQL
    CREATE USER <USER> WITH PASSWORD '<PASSWORD>';
    CREATE DATABASE "identity"
      WITH OWNER "postgres"
      ENCODING 'UTF8'
      LC_COLLATE = '<LOCALE>'
      LC_CTYPE = '<LOCALE>'
      TEMPLATE template0;
    \c identity postgres
    alter schema public owner to <USER>;
    GRANT ALL ON SCHEMA public TO <USER>;
    ALTER DEFAULT PRIVILEGES IN SCHEMA public
      GRANT SELECT, INSERT, UPDATE, DELETE ON tables TO <USER>;
    ALTER DEFAULT PRIVILEGES IN SCHEMA public
      GRANT SELECT, USAGE ON sequences TO <USER>;
EOSQL
and repository databases
export PGUSER=postgres
psql <<- EOSQL
    CREATE USER <USER> WITH PASSWORD '<PASSWORD>';
    CREATE DATABASE "repository"
      WITH OWNER "postgres"
      ENCODING 'UTF8'
      LC_COLLATE = '<LOCALE>'
      LC_CTYPE = '<LOCALE>'
      TEMPLATE template0;
    \c repository postgres
    alter schema public owner to <USER>;
    GRANT ALL ON SCHEMA public TO <USER>;
    ALTER DEFAULT PRIVILEGES IN SCHEMA public
      GRANT SELECT, INSERT, UPDATE, DELETE ON tables TO <USER>;
    ALTER DEFAULT PRIVILEGES IN SCHEMA public
      GRANT SELECT, USAGE ON sequences TO <USER>;
EOSQL
then the Flyway Migrator built into these services will be able to apply all database schema migrations at the first run.
1.6 Start Proxy and Database Services
Begin by launching the Envoy Proxy and PostgreSQL services using Docker. Navigate to the directory containing your docker-compose.yml file and execute:
docker-compose up -dThis command starts the services in detached mode. Verify that the services are running:
docker-compose psMake sure both envoy and postgres services have a status of Up.
2. Setting Up Archinsight Locally
To set up and run Archinsight on your local machine, follow these steps. The project may be opened and configured in any IDE.
This guide provides examples, using the service configurations outlined earlier.
2.1 Clone the Archinsight Repository
If you haven't already, clone the Archinsight repository:
git clone https://github.com/lonely-lockley/archinsight.git
cd archinsight
2.2 Configure Services
Translator
application.yaml
micronaut:
  server:
    cors:
      enabled: true
  security:
    enabled: false
  http:
    services:
      repository:
        url: 'http://localhost:3337'
Environment variables for Run/Debug configuration
| Parameter | Value |
|---|---|
| MICRONAUT_CONFIG_FILES | /path/to/translator/application.yml |
| MICRONAUT_SERVER_PORT | 3334 |
| DEV_MODE | true |
| LOG_LEVEL | error | warning | info | debug |
Repository
application.yaml
micronaut:
  server:
    cors:
      enabled: true
  security:
    enabled: false
datasources:
  default:
    url: 'jdbc:postgresql://localhost:5432/repository'
    username: '<USER>'
    password: '<PASSWORD>'
flyway:
  enabled: true
  datasources:
    default:
      enabled: false
      locations:
        - classpath:migration
Environment variables for Run/Debug configuration
| Parameter | Value |
|---|---|
| MICRONAUT_CONFIG_FILES | /path/to/repository/application.yml |
| MICRONAUT_SERVER_PORT | 3337 |
| DEV_MODE | true |
| LOG_LEVEL | error | warning | info | debug |
Identity
This service setup is quite tricky due to multiple integrations. You may skip creating real credentials for the client-id and client-secret parameters in the Google Cloud console and use the test login option instead.
The Identity service uses its own key pair for working with JWT tokens. In the development environment, you need to generate a new key pair. The service provides a built-in utility, KeyGenerator, for this purpose.
To generate a key pair, run the com.github.lonelylockley.archinsight.KeyGenerator class with two parameters:
- Key pair identifier
- Directory to store the generated files
Example command:
java -cp archinsight-identity.jar com.archinsight.identity.KeyGenerator test ./keys
application.yaml
micronaut:
  server:
    cors:
      enabled: true
  security:
    authentication: idtoken
    oauth2:
      clients:
        google:
          client-id: '<Google OAuth Client Id>'
          client-secret: '<Google OAuth Client Secret>'
          scopes:
            - openid
            - profile
            - email
          openid:
            issuer: 'https://accounts.google.com'
    endpoints:
      logout:
        enabled: true
        get-allowed: true
    redirect:
      prior-to-login: false
      login-success: 'http://localhost:8081/auth/ok'
      login-failure: 'http://localhost:8081/auth/fail'
datasources:
  default:
    url: 'jdbc:postgresql://localhost:5432/identity'
    username: '<USER>'
    password: '<PASSWORD>'
flyway:
  enabled: true
  datasources:
    default:
      enabled: false
      locations:
        - classpath:migration
archinsight:
  domain: 'localhost:8081'
  kid: 'test'
  redirect-uri: 'http://localhost:8081/oauth/callback/google'
Environment variables for Run/Debug configuration
| Parameter | Value |
|---|---|
| MICRONAUT_CONFIG_FILES | /path/to/identity/application.yml |
| MICRONAUT_SERVER_PORT | 3336 |
| DEV_MODE | true |
| LOG_LEVEL | error | warning | info | debug |
Renderer
application.yaml
micronaut:
  server:
    cors:
      enabled: true
  security:
    enabled: false
Environment variables for Run/Debug configuration
| Parameter | Value |
|---|---|
| MICRONAUT_CONFIG_FILES | /path/to/renderer/application.yml |
| MICRONAUT_SERVER_PORT | 3335 |
| DEV_MODE | true |
| LOG_LEVEL | error | warning | info | debug |
Editor-UI
application.yaml
micronaut:
  http:
    services:
      identity:
        url: 'http://localhost:3336'
      translator:
        url: 'http://localhost:3334'
      renderer:
        url: 'http://localhost:3335'
      repository:
        url: 'http://localhost:3337'
archinsight:
  # application public domain
  domain: 'localhost:8081'
  # this should be a public url
  loginUrl: 'http://localhost:8081'
Environment variables for Run/Debug configuration
| Parameter | Value |
|---|---|
| MICRONAUT_CONFIG_FILES | /path/to/editor/application.yml |
| MICRONAUT_SERVER_PORT | 8080 |
| DEV_MODE | true |
| LOG_LEVEL | error | warning | info | debug |
2.3 Check Application Running
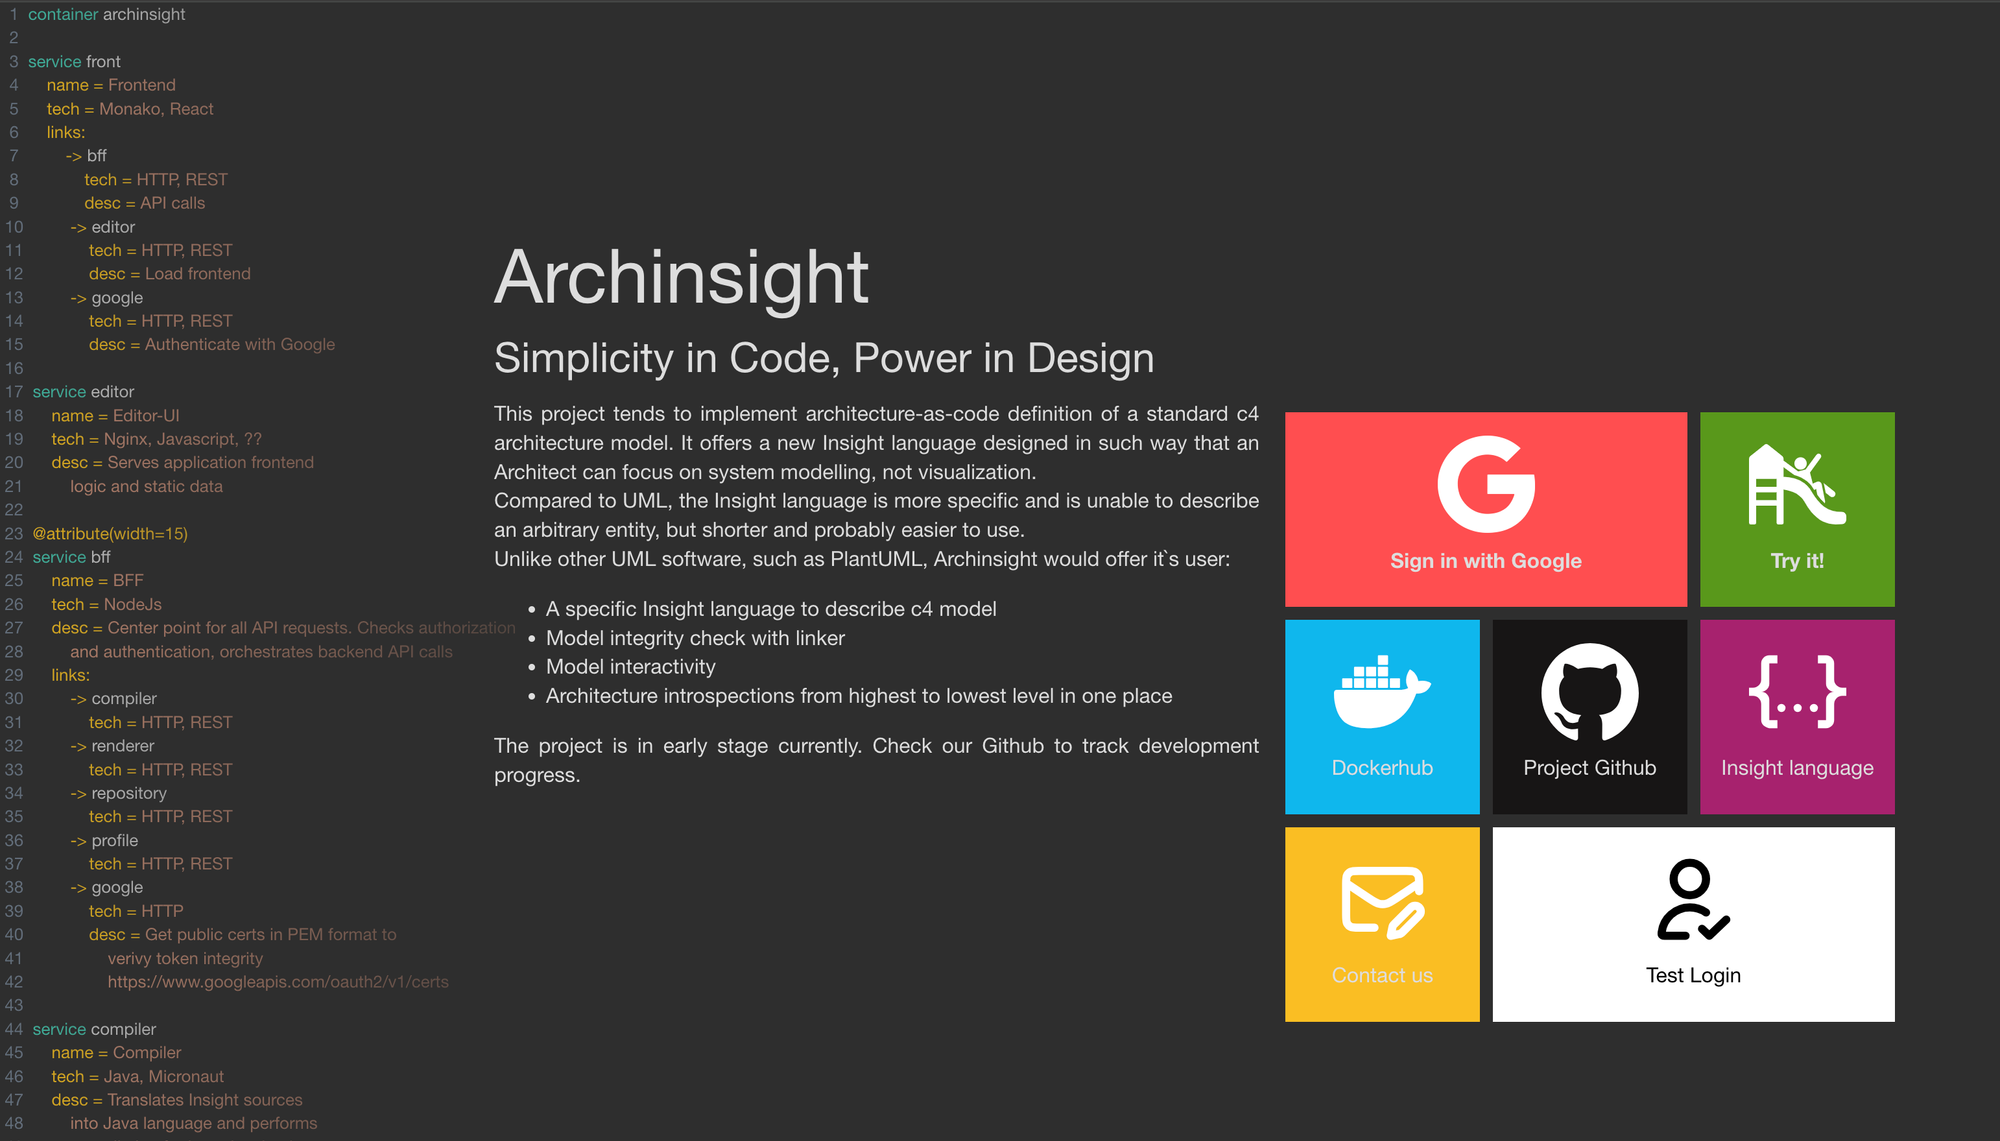
At this point, all services should be up and running. Open http://localhost:8081 in your browser to access the main page. If everything is set up correctly, you should see:
3. Final Steps
3.1 Setting up Test User
The "Test Login" button allows you to sign in with a test user account locally, without connecting to external OAuth providers. However, you must first create a test user. Use any database client to connect to the identity database and insert a user record with the email [email protected] - this is mandatory.
| Field | Arbitrary Value Allowed | Example |
|---|---|---|
| origin_id | Y | 100500 |
| N | [email protected] | |
| email_verified | Y | true |
| first_name | Y | John |
| last_name | Y | Doe |
| display_name | Y | Test User |
| avatar | N | http://localhost:8081/static/test-avatar.jpeg |
| source | N | local |
| locale | Y | en |
Now you may login into test account.
3.2 Setting up playground project
To make the Playground feature work, you need to create a project as any user and retrieve its UUID from the repository database that corresponds to the newly created project.
Update the Repository service configuration file application.yaml by adding the retrieved UUID into this block:
archinsight:
  playgroundRepositoryId: '00000000-0000-0000-0000-000000000000'
Once configured restart the repository service, and Archinsight Playground will be able to load and display the selected project without requiring authentication.